Free PDF Pattern! DIY Scrunchies
I love wearing scrunchies and I love making them! It's a great scrap busting project and it's a great way to get into sewing after having a break. Easy and quick. I have so many pretty vintage fabrics that are only a little bit left and they are great for scrunchies fro example. They are in fashion now again, first time since the 80's I guess? I have seen scrunchies with added ties that hang down everywhere too so I decided to make my own version of that design too. I created a free pattern - PDF download to accompany this tutorial. It's 6 pages that you can print at home and tape together.

Let's get sewing!
What you will need (affiliate links):
♥ PDF print at home FREE Download, subscribe to get the pattern
♥ Fabric, I used a scrap fabric I had in my stash.
♥ Matching thread (best thread)
♥ 0.6-1 cm (1/4-1/2") wide elastic. 16-20 cm (6-8") long. This one for example.
♥ Regular sewing machine
♥ Hand sewing needle. Example.
♥ A large safety pin, like this for example.
♥ Scissors or rotary cutter
♥ If you are using a rotary cutter like me you will also need a cutting mat. This is similar tothe one I'm using: Link.

*Scroll down for the video tutorial on how to make the scrunchie with added ties*
Cut out your fabric. Seam allowance is included in the pattern. Cut the tie if you want to add that. Cut a 16-20 cm (6-8") length of the elastic.

Fold fabric lengthwise right sides together. Pin. Use a 0.5cm (1/4") seam allowance on all seams.

Sew the folded fabric. Start and end at the notches. Don't sew all the way.

Turn the fabric tube inside out.
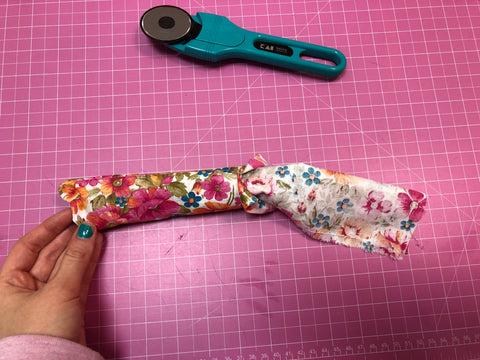
Then sew the short sides of the fabric right sides together to close the tube and make a circle.

Now you have a circular shape with an opening.

Insert the elastic using a safety pin to be able to feed it through the circle.

Place the ends of the elastic on top of each other and sew them together. You can do this by hand or with the sewing machine. Sew back and forth a few times and make sure it feels secure. You don't want them to break apart.

Close the gap in the circle either with a straight stitch on the sewing machine or by hand. I chose to sew on the machine for this one.

You can turn the sewn edge to the middle of the scrunchie if you like. I did that to get a more clean look.
Then you're done!

Video tutorial:
That's all for today guys! I hope you enjoyed this tutorial.
Leave a comment below or send me an email (josefine@ploenpatterns.com) if you need help with anything or have any questions at all :)
♥ ♥ ♥
Josefine
Ploen Patterns